
Making a virtual machine on Azure is not hard. But a lot of people still mess it up, mostly because they rush the setup or pick the wrong size and end up with a surprise bill. This blog walks through the whole process in plain words, what usually goes right, what usually goes wrong, and a few honest opinions on where beginners waste time. If you’re getting into Microsoft Azure cloud services for work or just to learn Azure VM creation, this should make things click faster than most tutorials out there. This is written by the team at CyberMind IT Solutions, based on setups done for real clients, not just theory from a manual.
What a Virtual Machine Actually Is
Forget the fancy definitions for a second. A virtual machine is just a computer that lives inside another, bigger computer. It has its own operating system, its own storage, its own everything, but there’s no physical box for it. It runs on Microsoft’s hardware, sitting in a data center somewhere, sharing space with a bunch of other virtual machines that have no clue about each other.
The tech behind this is called a hypervisor. It’s the part that splits one big server into smaller chunks and hands each chunk to a different VM. Most people don’t need to understand the hypervisor deeply. Just know that it’s the reason one physical machine can quietly run dozens of separate “computers” at once without them stepping on each other.
So when someone talks about a cloud virtual machine, they mean renting a slice of that big server. You decide how big a slice you need. Too small, and things run slow. Too big, and the bill hurts for no good reason.
Why So Many Teams Pick Microsoft Azure Cloud Services
There are other cloud providers, sure. But Azure keeps coming up for a few solid reasons, and not all of them are about the tech itself.
Flexibility is the big one. Traffic spikes, project grows, deadline moves up, whatever the reason, Azure lets you bump up the VM’s power in minutes instead of waiting days for new hardware. And when things slow back down, scale it back and stop paying for what you don’t use. That part works well most of the time. It’s one of the few “as advertised” features in cloud computing.
Then there’s the operating system choice. Windows Server, Ubuntu, Debian, Red Hat, pick whatever fits the project. Some images even come pre-loaded with software like SQL Server, so setup takes less time. This is genuinely useful, though not always as smooth as Microsoft makes it sound. Pre-configured images sometimes come with extra junk nobody asked for, so it’s worth checking what’s actually installed before building on top of it.
Another reason, and honestly a big one for companies already using Microsoft tools, is how well Azure connects with things like Office 365 and Active Directory. If a business already runs on Microsoft software, moving to Azure feels less like starting over and more like extending what’s already there.
Security gets talked about a lot too, and fair enough, Microsoft does put serious money into it. But security in the cloud is never fully hands-off. A well-built VM on Azure can still get compromised if someone leaves the wrong port open or picks a weak password. The platform gives good tools. It doesn’t do the whole job by itself.
Before Touching the Azure Portal
A few things should be sorted out first, because winging it usually leads to a messy setup that has to get redone.
An active Azure account is step one. The free trial works fine for testing and learning, no need to spend real money just to figure out how things work.
Next, get clear on why this VM exists. A VM for hosting a small test website needs nothing close to what a VM running a heavy database needs. Skipping this thought and just picking “something in the middle” is one of the most common mistakes beginners make. It either wastes money or causes performance problems down the line.
Budget matters too. Not because Azure is expensive by default, but because it’s very easy to click through the setup screens and accidentally choose a VM size way above what’s actually needed. Knowing the budget beforehand keeps that in check.
Step-by-Step: Creating the Virtual Machine
Here’s the actual process, the part most guides rush through without explaining why each step matters.
Step 1: Log Into the Azure Portal
Sign in with a Microsoft account. Nothing tricky here, this just gets to the dashboard, which is basically the control room for everything on Azure.
Step 2: Start Creating the VM
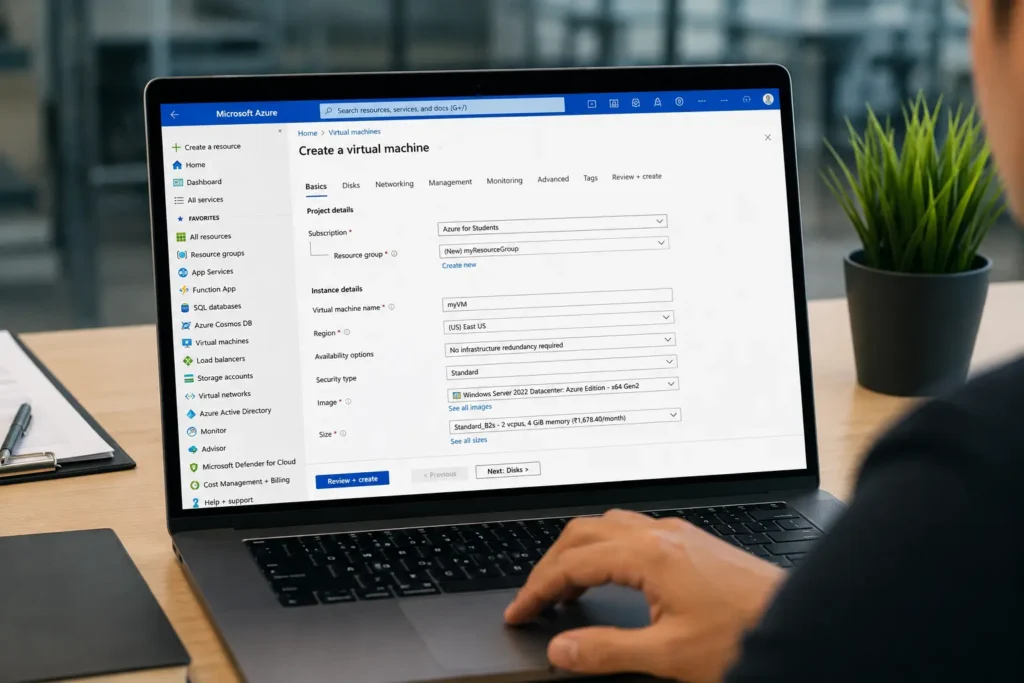
Look for “Create a resource,” then find Virtual Machine under the Compute section. This opens a form split into tabs, Basics, Disks, Networking, Management. Most of the important decisions happen in the first tab, so don’t rush through it.
Step 3: Fill in the Basics
Pick a subscription, this is the billing account. Then choose or create a resource group, think of it like a folder that keeps related resources together. This sounds like a small detail early on, but once there are five or six VMs running, a messy resource group setup becomes a real headache.
Name the VM something that actually makes sense later. “test-vm-1” is fine for a quick experiment, but for anything long-term, use a name that tells what it’s for.
Pick a region. Closer to the actual users usually means faster load times. This part often gets ignored, and it shouldn’t, since picking a region on the other side of the world “because it was cheaper” can quietly hurt performance for everyone using the app.
Choose the image, meaning the operating system. Windows or Linux, depends on the project needs.
Then comes VM size, and this is where most beginners go wrong. It’s tempting to just pick something that “looks powerful” without checking if it’s needed. A general judgement here: unless there’s a clear reason for a big VM, start small. Azure makes resizing easy later, so there’s rarely a good reason to overpay from day one just to feel safe.
Set up the login, a username and password, or an SSH key for Linux machines. Keep this saved somewhere safe. Losing VM login details is more common than people admit, and recovering access is not always quick.
Step 4: Set Up the Disks
Standard HDDs are cheaper and fine for light work. Premium SSDs cost more but load faster, useful for anything database-heavy or performance-sensitive. Most small projects don’t actually need Premium SSDs, even though it’s often picked “just in case.” That’s usually money spent for no real benefit.
Step 5: Handle the Networking
This part decides how the VM talks to the internet. Azure sets up a default virtual network automatically, and for most beginners, that default is enough.
Inbound port rules matter more than people think. Only open what’s actually needed, HTTP and HTTPS for a website, RDP for Windows remote access, SSH for Linux. Leaving extra ports open “just in case” is one of the most common security mistakes seen in real setups. It rarely causes problems immediately, which is exactly why people get careless about it, until it does cause a problem.
Step 6: Turn On Monitoring
Enabling monitoring shows CPU use, memory use, network activity. It’s an easy box to check and often skipped, mostly because it feels optional at setup time. It’s not. Catching a resource problem early is a lot less stressful than finding out after something crashes.
Step 7: Review, Then Create
Azure shows a cost estimate before the final click. Actually read it. This step gets skipped constantly, and it’s the exact spot where people notice, too late, that they picked a bigger or pricier setup than intended. Once everything looks right, hit create. Deployment usually takes a few minutes.
Step 8: Connect to the VM
Windows VMs connect through Remote Desktop, using the public IP and login details from earlier. Linux VMs usually connect through SSH from a terminal. Once connected, the VM behaves exactly like a regular computer, just one that happens to live in a data center instead of on a desk.
What Usually Works and What Usually Fails
A few patterns show up again and again with Azure VMs.
What tends to work well: starting small and scaling up later, sticking to only the ports actually needed, and turning on monitoring from day one instead of adding it after something breaks. These three habits alone prevent most of the common problems people run into.
What tends to fail: picking a bigger VM size “for safety,” forgetting to shut down test VMs when they’re not needed, and skipping the cost review screen because it feels like just another “next” button. None of these mistakes are dramatic on their own, but together they quietly drive up costs and create security gaps that could’ve been avoided with just a bit more attention.
How This Fits Into Microsoft Azure Training
Learning Azure VM creation is usually the first real hands-on skill in any Microsoft azure path, and for good reason. Virtual machines sit underneath a lot of other Azure services, hosting, testing environments, database setups. Once creating and managing a VM feels normal, other concepts like virtual networks and load balancers make a lot more sense, since they build on the same basic idea.
Anyone serious about cloud computing as a career, or just running a business more independently, should spend real time actually building and breaking a few test VMs. Reading about it only gets someone halfway there.
Frequently Asked Questions
Is it expensive to create a virtual machine in Azure?
Depends completely on size and how long it stays running. Small test VMs cost very little, and the free trial credit covers a good chunk of early experimenting. Bigger production VMs cost more, but the spending stays visible and adjustable the whole time.
Can the VM size be changed after it’s created?
Yes, and this is honestly one of Azure’s better features. Start small, resize later if the project actually grows. No need to rebuild from scratch.
Does creating a VM require coding knowledge?
No. The portal handles setup visually, step by step. Coding becomes relevant later for automating VM creation through scripts, but the basic setup needs none of that.
What’s the real difference between a Windows VM and a Linux VM?
Mainly the operating system and what runs well on it. Windows fits Microsoft-heavy software needs. Linux tends to be the pick for web hosting and open-source projects, partly because it’s usually cheaper on licensing.
How long does the whole setup take?
A few minutes once the form is filled out. Slightly longer for bigger VM sizes or heavier operating system images, but nothing close to setting up physical hardware.
Conclusion
Building a VM on Azure isn’t the hard part. Staying disciplined about size, ports, and cost review, that’s where most people trip up. The platform gives enough rope to either build something solid or waste money without noticing, and the difference usually comes down to slowing down for those few extra minutes during setup.
Anyone reading this should just go build one. Not read another guide, not watch another video, actually open the free tier and click through it. Resize it, break the networking rules on purpose, shut it down, spin up a new one. That’s the fastest way to actually get comfortable with it, way faster than any tutorial can make it feel.
And if the setup needs to support something real, an actual business, actual customers, actual uptime pressure, that’s a different level of care than a test VM needs. That’s the point where getting help from a team that’s already made these mistakes on someone else’s projects, like CyberMind IT Solutions, saves a lot more than it costs.